Why You’ll Love this Rainbow Cake Recipe
If you’re looking for a show-stopping dessert that brings joy to any occasion, you’ll love this Rainbow Cake recipe.
I can’t help but smile when I see its vibrant layers, each bursting with color and flavor. The combination of essences adds a delightful twist, making every bite a surprise.
It’s not just visually stunning; the moist texture and rich taste will have everyone asking for seconds.
Whether it’s a birthday, celebration, or just a treat for yourself, this cake elevates any moment.
Trust me, once you make it, it’ll become your go-to dessert for special occasions!
Ingredients of Rainbow Cake
When it comes to baking a cake that can light up a room, the ingredients are everything. For this vibrant Rainbow Cake, you’re going to need a mix of basic baking staples and some fun colors to bring it to life.
The beauty of this cake lies in its colorful layers and delightful flavors, so let’s gather what we need before we plunge into the fun part—making this masterpiece.
Here’s what you’ll need:
- 1 cup butter
- 1 3/4 cups sugar
- 3 cups flour
- 5 eggs
- 1 1/2 teaspoons baking powder
- 1/2 teaspoon bicarbonate of soda
- 1 cup milk
- 1 teaspoon green food coloring
- 1 teaspoon red food coloring
- 1 teaspoon yellow food coloring
- 1 teaspoon rose essence
- 1 teaspoon pineapple essence
- 1 teaspoon strawberry essence
Now, let’s chat about these ingredients for a moment. You might be tempted to skip the essences thinking they’re just fancy add-ins, but trust me, they’re the secret weapon that takes this cake from ordinary to extraordinary.
Each essence adds a unique flavor, making every bite a little adventure. And don’t stress if you can’t find a specific essence; you can always substitute with other flavors you love—vanilla would work in a pinch, or maybe even almond for a twist.
Just remember to have fun with it, because that’s what baking is all about. So, gather your colorful ingredients and get ready to create something that not only tastes amazing but looks like a celebration on a plate.
How to Make Rainbow Cake

Alright, let’s plunge into the delightful process of making this vibrant Rainbow Cake. First things first, grab your mixing bowl and let’s start with 1 cup of butter. You want that butter nice and soft, so if you forgot to take it out of the fridge ahead of time, just pop it in the microwave for a few seconds. Not too long, though. We’re looking for soft, not melted—unless you want to make a butter puddle instead of a cake, which, spoiler alert, isn’t the goal here.
Now, in that bowl with the butter, sprinkle in 1 3/4 cups of sugar and cream them together until it’s all nice and fluffy. This step is essential, as it helps to incorporate air into the mixture, making your cake light and airy.
Next, here comes the fun part: the eggs. You’ll need 5 eggs, and it’s best to add them one at a time. I know it sounds tedious, but trust me, your cake will thank you later. Just crack an egg in, mix it well, and repeat until all five are in there.
Once your mixture is smooth and combined, it’s time to incorporate the dry ingredients. Sift together 3 cups of flour, 1 1/2 teaspoons of baking powder, and 1/2 teaspoon of bicarbonate of soda—no one wants clumpy cake.
Gradually add this dry mix to your butter-sugar-egg concoction, alternating with 1 cup of milk. This back-and-forth mixing helps keep everything creamy and avoids any flour explosions, which, let’s be real, are just messy and not the kind of excitement we’re looking for.
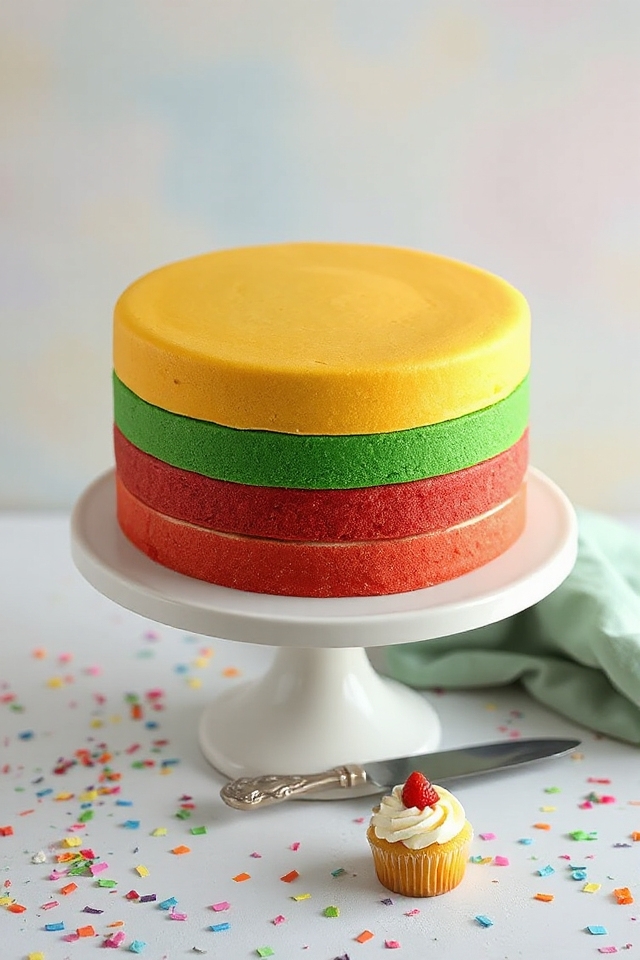
Now here comes the colorful part. Divide your batter into three equal parts. To the first part, add 1 teaspoon of green food coloring and a touch of rose essence. In the second part, mix in 1 teaspoon of yellow food coloring and pineapple essence. Finally, blend 1 teaspoon of red food coloring with strawberry essence into the last part. Now you have three beautiful, vibrant colors to work with.
Time to layer them in a round cake tin. Pour the green batter in first, followed by the red, and then the yellow on top. You want to create those stunning layers that will be a feast for the eyes.
Pop your cake in the oven and let it bake at 350°F for about 45 minutes. Just enough time to clean up your kitchen and maybe daydream about the slice of rainbow goodness that’s coming your way.
Once it’s done, let it cool before you indulge. And trust me, this cake isn’t just a treat for the taste buds; it’s a party for the eyes, too!
Rainbow Cake Substitutions & Variations
Have you ever thought about how you can customize your Rainbow Cake to suit different tastes or dietary needs?
I’ve experimented with various substitutions that work beautifully. For a gluten-free option, I’ve used almond or coconut flour instead of regular flour. If you’re dairy-free, almond milk or coconut milk is a great swap for regular milk. You can also replace butter with coconut oil or vegan butter.
To add unique flavors, try different essences, like lemon or vanilla. And if you want a healthier twist, consider using applesauce instead of sugar.
The possibilities are endless, so get creative and enjoy!
What to Serve with Rainbow Cake
While enjoying a slice of vibrant Rainbow Cake, I often find myself thinking about the perfect accompaniments that can elevate the experience.
A dollop of whipped cream adds a light and airy touch, balancing the cake’s sweetness. Fresh berries, like strawberries or blueberries, bring a burst of flavor and a lovely contrast.
For a rejuvenating twist, I love serving it with a scoop of vanilla ice cream. If I’m feeling adventurous, a drizzle of chocolate sauce can take it to another level.
Each addition enhances the colorful layers, making every bite a delightful celebration of flavors.
Additional Tips & Notes
When baking a Rainbow Cake, a few key tips can make a big difference in the final result. First, make sure all your ingredients are at room temperature; it helps the batter mix smoothly.
I recommend using gel food coloring for more vibrant hues. When layering, gently pour the batter to avoid mixing the colors.
Always check for doneness with a toothpick—if it comes out clean, the cake’s ready. Let it cool completely before frosting; this prevents melting.
Finally, don’t hesitate to get creative with your essence flavors; it’s an opportunity to personalize your cake! Enjoy your baking!