Why You’ll Love this Red Velvet Pound Cake Recipe
When you take your first bite of this Red Velvet Pound Cake, you’ll understand why it’s a favorite at gatherings and special occasions.
The rich, velvety texture melts in your mouth, with a perfect balance of sweetness and subtle hints of vanilla and almond. Each slice offers a stunning deep red hue, making it a showstopper on any dessert table.
The cake is moist yet sturdy, perfect for layering with frosting or enjoying on its own. Trust me, once you taste it, you’ll be hooked and keen to share this delightful treat with friends and family.
Ingredients of Red Velvet Pound Cake
When it comes to baking a Red Velvet Pound Cake, the ingredients are key to creating that rich and decadent flavor you crave. This cake is all about combining the right components to get that perfect texture and taste.
The beauty of this recipe is that it calls for both classic baking staples and a few unique touches that make it stand out. So, gather your ingredients, roll up your sleeves, and let’s explore what you need to make this show-stopping dessert.
Ingredients:
- 1 1/2 cups Crisco (or your favorite shortening)
- 3 cups sugar
- 7 eggs
- 3 cups cake flour
- 1 teaspoon vanilla extract
- 1 teaspoon almond extract
- 1/4 teaspoon salt
- 1 (2 ounce) bottle red food coloring
- Frosting (enough for your desired amount)
- 1/2 cup butter (softened)
- 3 ounces cream cheese (softened)
- 1 teaspoon vanilla (for frosting)
- 1 box (10x) confectioners’ sugar
Now, let’s chat about these ingredients. You might be wondering, “Why so much sugar?” Well, sugar not only sweetens the cake, but it also helps create that lovely moist texture.
And if you’re thinking of swapping out the Crisco for butter, I get it—who doesn’t love butter? Just keep in mind that using shortening gives it that classic pound cake density.
Also, don’t skimp on the food coloring; it’s what makes the cake that stunning red color we all adore.
And if you’re feeling adventurous, you could even experiment with different extracts or add-ins to make this cake your own. Just remember, baking is as much about having fun as it’s about following the recipe.
Happy baking!
How to Make Red Velvet Pound Cake

Now that you have your ingredients all lined up and ready to go, it’s time to plunge into the delightful world of baking a Red Velvet Pound Cake. First things first, grab that 1 1/2 cups of Crisco and cream it together with 3 cups of sugar. You want to beat that mixture well—think of it as a mini workout for your arms. You’re aiming for a light and fluffy texture, which is an essential step for the cake’s overall success.
Once you’ve got that nice and creamy, it’s time to introduce the 7 eggs, but here’s the trick: add them one at a time. Yes, one at a time. This is where patience comes in, but trust me, it’ll be worth it when your cake rises perfectly!
Next up, let’s get to the fun part—adding in the dry ingredients. Sift together your 3 cups of cake flour and 1/4 teaspoon of salt, and then gradually incorporate that into your egg-sugar mixture. But wait, there’s more! You’ll also need to add in the 1 teaspoon of vanilla extract, 1 teaspoon of almond extract, and that magical 2-ounce bottle of red food coloring. Feel free to channel your inner artist as you mix everything together.
Just remember to alternate the dry ingredients with some milk (if you have it on hand) to keep that batter nice and smooth. Once everything is well combined, pour the batter into a greased bundt pan or loaf pan and pop it into the oven preheated to 325°F. Bake it for about 1 hour and 15 minutes, or until a toothpick comes out clean.
Now, while that beauty is baking, you can prepare the frosting. Soften 1/2 cup of butter and 3 ounces of cream cheese, and then beat them together with 1 teaspoon of vanilla. Gradually add in that box of 10x confectioners’ sugar until it reaches a perfect spreading consistency.
Once your cake is cool, it’s time to slather on that frosting. I must admit, frosting is my favorite part, and you can never have too much—right? So go ahead, be generous.
Finally, step back and admire your creation. You’ve just made a Red Velvet Pound Cake that’s not just a feast for the eyes but a treat for the taste buds as well. Enjoy every slice, and don’t worry if it doesn’t come out perfect; it’s all about the journey and the delicious memories you’ll create along the way!
Red Velvet Pound Cake Substitutions & Variations
If you’re looking to mix things up with your Red Velvet Pound Cake, there are plenty of substitutions and variations to contemplate.
For a lighter texture, swap half the flour for almond flour. You can also use buttermilk instead of regular milk for a tangy twist.
Want to boost flavor? Try adding a dash of espresso powder or a hint of cinnamon.
If you’re not fond of cream cheese frosting, a classic buttercream or even a chocolate ganache can elevate the cake.
And for those who prefer a different color, use blue or green food coloring for a fun twist!
What to Serve with Red Velvet Pound Cake
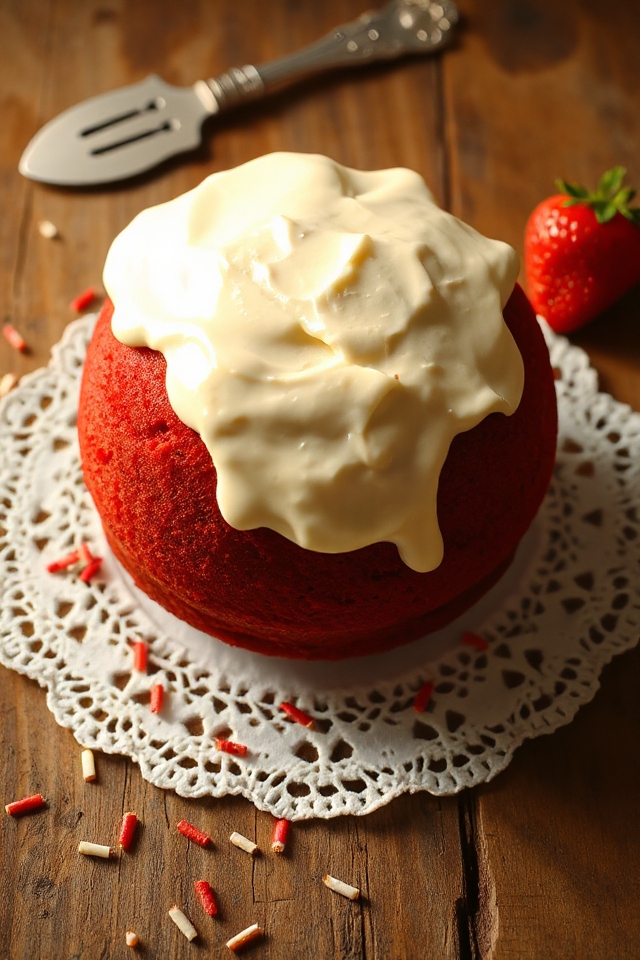
What pairs well with the rich, velvety texture of a Red Velvet Pound Cake? I love serving it with a dollop of sweetened whipped cream for a light contrast.
A scoop of vanilla ice cream also does wonders, melting into the cake’s warmth. For a bit of tang, I recommend a side of cream cheese frosting, which complements the cake’s flavors perfectly.
Fresh berries, like raspberries or strawberries, add a pop of color and an invigorating burst. Finally, a drizzle of chocolate sauce can enhance the indulgence, making every bite unforgettable.
Trust me; your guests will adore these pairings!
Additional Tips & Notes
To guarantee your Red Velvet Pound Cake turns out perfectly, I recommend measuring your ingredients accurately and using room temperature eggs and butter for better incorporation.
Also, don’t skip the food coloring; it gives that signature red hue. When creaming the butter and shortening, make sure it’s light and fluffy for a tender cake.
If you want a richer flavor, consider adding a splash of buttermilk. Keep an eye on baking time, as ovens can vary.
Finally, let your cake cool completely before frosting to avoid a melty mess. These little tips will elevate your cake to a whole new level!